
Vue.js2最佳实践(持续更新至Vue.js3出来😁)
1 写在开头
文档较长,可按需耐心反复阅读。其中带(官)的是直接引用了 Vue 官方的风格指南。针对 Vue 性能优化相关内容,单独在内容后进行了标注,可通过搜索“性能优化”四个字查找。
2 Vue.js2 模板工程说明
2.1 目的
封装常用功能和配置,规范代码编写,保证输出的一致性,方便前端人员在此基础上快速开发新项目的业务模块。
2.2 下载
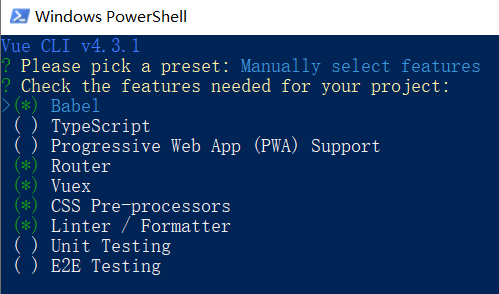
模板项目(Boilerplate)分为 JavaScript 和 TypeScript 两个版本。
JS:
git clone https://github.com/THS-FE/vue2-starter-js.gitTS:
git clone https://github.com/THS-FE/vue2-starter-ts.git2.3 目录结构
该目录结构适合中大型项目,如果是小型项目,可对目录或模块进行适当删减(尤其是后面有可选标识的)。
2.3.1 JavaScript 版
1 | ├── public // 静态资源 该文件夹下的内容在构建时会直接拷贝到dist文件夹下 |
在创建该项目时,没有添加 PWA、单元测试和端到端测试。原因:PWA 并没有普及,没多少人会使用;各类测试对于需求经常变化的项目来说就是个累赘,测试用例还没有写完,需求变了…
对项目相关工具配置项不了解的,可参看 《从零开始搭建前端项目开发环境》
2.3.2 TypeScript 版
因 Vue3.0 取消了基于类的组件(class based component),使用 functional based component+hooks(也就是 Composition API),为了降低学习成本,在使用脚手架创建项目时,没有启用 vue-class-component。
1 | ├── public // 静态资源 该文件夹下的内容在构建时会直接拷贝到dist文件夹下 |
2.4 配置变更
以下内容均已在模板项目里添加,这里只是做个说明。
2.4.1 新增依赖
2.4.1.1 Normalize.css 6.2k
为默认的 HTML 元素样式上提供了跨浏览器的高度一致性。相比于传统的 CSS reset,Normalize.css 是一种现代的、为 HTML5 准备的优质替代方案。
安装:
npm i normalize.css -S已在 main.js 文件中引入:
import 'normalize.css';2.4.1.2 moment 239.1kDay.js 6.3k
是一个轻量的处理时间和日期的 JavaScript 库,和 Moment.js 的 API 设计保持完全一样,用于解析、检验、操作、以及显示日期。
安装:
npm i dayjs -S可在任何需要的文件中引入:
1 | import dayjs from "dayjs"; |
2.4.1.3 Element 637.7k
一套为开发者、设计师和产品经理准备的基于 Vue2.0 的桌面端组件库。
安装:
npm i element-ui -S已在 plugins/index.js 文件中引入:
1 | import ElementUI from "element-ui"; |
项目中已改成按需加载。
2.4.1.4 axios 12.9k
是一个基于 promise 的 HTTP 库,可以用在浏览器和 node.js 中。
安装:
npm i axios -S已在 utils/request.js 文件中引入:
import axios from 'axios';2.4.1.5 vue-event-proxy 1.79kb
让 Vue.js 支持全局事件的库。
- 通过增加前缀实现全局事件,能在不同组件间进行数据通信
- 组件销毁自动移除注册的事件
安装:
npm i vue-event-proxy -S已在 plugins/index.js 文件中引入:
1 | import EventBus from "vue-event-proxy"; |
TS 版需要同时在 shims-vue.d.ts 文件中添加模块申明:
declare module 'vue-event-proxy'在非父子组件间使用(相当于事件总线):
1 | // 发布 |
如不加 global: 前缀,则和平时使用的方式一致。
2.4.2 新增功能
2.4.2.1 request
定义拦截器对 HTTP 请求配置做统一处理。
已写在 utils/request.js 文件中,需按实际项目需要进行修改:
1 | import axios from "axios"; |
如果使用同一个服务地址,那么还需要在 vue.config.js 中要修改:
// 设置 HTTP 请求的 base url,需修改
1 | // 设置HTTP请求的base url,需修改 |
2.4.2.2 导航守卫
通过跳转或取消的方式守卫导航。
已写在 router/index.js 文件中,需按实际项目需要进行修改:
1 | router.beforeEach((to, from, next) => { |
2.4.2.3 路由拆分
按模块拆分成不同的路由文件,方便多人协作同步开发,互不影响。
可在 router/index.js 文件中添加:
1 | import homeRoutes from './home'; // 引入首页模块的路由 |
2.4.2.4 store 拆分
如果项目非常大状态就会有很多,如不进行分类处理,所有的状态和对状态的处理都放一个文件里面,代码会很臃肿,不利于后期的维护。
在 store/index.js 文件中:
1 | import mutations from "./mutations"; |
2.4.2.5 Vue Composition API
方便以后平滑过渡到 Vue.js3.0。
安装:
npm i @vue/composition-api -S已在 plugins/index.js 文件中引入:
1 | import VueCompositionApi from "@vue/composition-api"; |
2.4.2.6 主题切换
使用 CSS Variables
2.4.3 配置新增
2.4.3.1 vue.config.js
为了不改变默认配置,在 configureWebpack 中通过 Object.assign 的方式合并配置,这种方式只会对配置进行新增、修改,而不会过多地改变默认配置。
2.4.3.1.1 去除 console
1 | // 去除 console |
2.4.3.1.2 分离第三方库
1 | // 单独将 elementUI 拆包 |
2.4.3.2 Element 按需加载 (性能优化 1)
安装:
npm install babel-plugin-component -D修改 babel.config.js:
1 | module.exports = { |
2.5 安装运行
在项目所在文件夹下运行命令行安装依赖:
npm install如果 NPM 下载慢的话,可使用以下命令:
npm install --registry=https://registry.npm.taobao.org项目启动:
npm run serve项目打包:
npm run build3 命名
3.1 组件
尽量将组件放在对应目录所属模块的文件夹之下,若只有一个文件的则直接放在 components 或 views 目录下,如:login,home。
组件名尽量为名词,开头的单词就是所属模块的名字。
3.1.1(官)使用两个或以上单词
根组件 App 以及 <transition>、<component> 之类的 Vue 内置组件除外。这样做可以避免跟现有的以及未来的 HTML 元素相冲突,因为所有的 HTML 元素名称都是单个单词的。
Bad
1 | Vue.component("todo", { |
1 | export default { |
Good
1 | Vue.component("todo-item", { |
1 | export default { |
常用的结尾单词有
1 | ***-detail.vue |
3.1.2(官)使用PascalCase 或kebab-case 命名组件文件
单词大写开头对于代码编辑器的自动补全最为友好。
Bad
1 | components/ |
1 | components/ |
Good
1 | components/ |
3.1.3(官)JS/JSX 中的组件名应该始终使用 PascalCase 进行命名
在 JavaScript 中,PascalCase 是类和构造函数 (本质上任何可以产生多份不同实例的东西) 的命名约定。Vue 组件也有多份实例,所以同样使用 PascalCase 是有意义的。额外的好处是,在 JSX (和模板) 里使用 PascalCase 使得代码的读者更容易分辨 Vue 组件和 HTML 元素。
然而,对于只通过 Vue.component 定义全局组件的应用来说,推荐 kebab-case 作为替代。原因是:
- 全局组件很少被 JavaScript 引用,所以遵守 JavaScript 的命名约定意义不大。
- 这些应用往往包含许多 DOM 内的模板,这种情况下是必须使用 kebab-case 的。
Bad
1 | Vue.component("myComponent", { |
1 | import myComponent from "./MyComponent.vue"; |
1 | export default { |
1 | export default { |
Good
1 | Vue.component("MyComponent", { |
1 | Vue.component("my-component", { |
1 | import MyComponent from "./MyComponent.vue"; |
1 | export default { |
3.1.4(官)和父组件紧密耦合的子组件应该以父组件名作为前缀命名
可以试着通过在其父组件命名的目录中嵌套子组件以解决这个问题。比如:
1 | components/ |
或:
1 | components/ |
但是这种方式并不推荐,因为这会导致:
- 许多文件的名字相同,使得在编辑器中快速切换文件变得困难。
- 过多嵌套的子目录增加了在编辑器侧边栏中浏览组件所花的时间。
Bad
1 | components/ |
1 | components/ |
Good
1 | components/ |
1 | components/ |
3.1.5(官)以高级别的(通常是一般化描述的) 单词开头,以描述性的修饰词结尾
比如对于一个带搜索表单的应用来说,它可能包含这样的组件:
1 | components/ |
很难看出来哪些组件是针对搜索的。现根据规则给组件重新命名:
1 | components/ |
因为编辑器通常会按字母顺序组织文件,所以现在组件之间的重要关系一目了然。
若换成多级目录的方式,把所有的搜索组件放到“search”目录,把所有的设置组件放到“settings”目录。只推荐在非常大型 (如有 100+ 个组件) 的应用下才考虑这么做,因为:
- 在多级目录间找来找去,要比在单个 components 目录下滚动查找花费更多的精力。
- 存在组件重名 (比如存在多个 ButtonDelete 组件) 的时候在编辑器里更难快速定位。
- 让重构变得更难,为一个移动了的组件更新相关引用时,查找/替换通常并不高效。
Bad
1 | components/ |
Good
1 | components/ |
3.1.6(官)使用完整单词而不是缩写
编辑器中的自动补全已经让书写长命名的代价非常之低了,而其带来的明确性却是非常宝贵的。不常用的缩写尤其应该避免。
Bad
1 | components/ |
Good
1 | components/ |
3.1.7(官)基础组件(也就是展示类的、无逻辑的或无状态的组件) 应该全部以一个特定的前缀开头,比如 Base
- 当在编辑器中以字母顺序排序时,应用的基础组件会全部列在一起,这样更容易识别。
- 因为组件名应该始终是多个单词,所以这样做可以避免在包裹简单组件时随意选择前缀 (比如 MyButton、VueButton)。
- 因为这些组件会被频繁使用,所以可能想把它们放到全局而不是在各处分别导入它们。
Bad
1 | components/ |
Good
1 | components/ |
3.1.8(官)单个活跃实例的组件应该以 The 前缀命名,以示其唯一性
这不意味着组件只可用于一个单页面,而是每个页面只使用一次。这些组件永远不接受任何 prop,因为它们是为应用定制的,而不是它们在应用中的上下文。如果发现有必要添加 prop,那就表明这实际上是一个可复用的组件,只是目前在每个页面里只使用一次。
Bad
1 | components/ |
Good
1 | components/ |
3.2 Prop
3.2.1(官)应该始终使用 camelCase,而在模板和 JSX 中应该始终使用 kebab-case
我们单纯的遵循每个语言的约定。在 JavaScript 中更自然的是 camelCase。而在 HTML 中则是 kebab-case。
Bad
1 | props: { |
1 | <WelcomeMessage greetingText="hi" /> |
Good
1 | props: { |
1 | <WelcomeMessage greeting-text="hi" /> |
3.3 method
3.3.1 要是动宾短语
Bad
go、nextPage、show、open、loginGood
jumpPage、openCarInfoDialog尽量使用常用单词开头:
set、get、open、close、jump3.3.2 使用 camelCase 进行命名
Bad
get_list_data、getlistDataGood
getListData3.4 事件
3.4.1(官)使用 kebab-case 进行命名
无论是 camelCase 或 PascalCase 的命名,都能被监听到,但 DOM 模板中使用会感觉怪怪的。
3.4.2 以动词或是名词结尾
如:upload-success、upload-error 、 dropzone-upload-success、dropzone-upload-error。
3.5 文件夹
3.5.1 尽量是小写的单个名词
有复数结构时,要采用复数命名法。例:scripts, styles, images。
3.5.2 如不是单个,则使用 kebab-case 进行命名
使用 kebab-case 命名的文件夹比 camelCase 命名的文件夹看起来更清晰,可参考 node_modules 文件夹里的内容。
Bad
1 | errorPage; |
Good
1 | error - page; |
3.6 文件
3.6.1 *.js 文件命名规范
统一使用 kebab-case 风格
3.6.2 *.ts 文件命名规范
统一使用 kebab-case 风格
3.6.3 *.scss 文件命名规范
统一使用 kebab-case 命名风格
3.6.4 其它文件命名规范
统一使用 kebab-case 命名风格
4 一般约束
4.1(官)顶级 App 组件和布局组件中的样式可以是全局的,但是其它所有组件都应该是有作用域的
这条规则只和单文件组件有关。不一定要使用 scoped 特性。设置作用域也可以通过 CSS Modules,那是一个基于 class 的类似 BEM 的策略,当然也可以使用其它的库或约定。
Bad
1 | <template> |
Good
1 | <template> |
1 | <template> |
1 | <template> |
4.2(官)始终为插件、混入等不考虑作为对外公共 API 的自定义私有属性使用 $_ 前缀。并附带一个命名空间以回避和其它作者的冲突
Vue 使用 _前缀来定义其自身的私有属性,所以使用相同的前缀 (比如_update) 有覆写实例属性的风险。即便检查确认 Vue 当前版本没有用到这个属性名,也不能保证和将来的版本没有冲突。
对于 $ 前缀来说,其在 Vue 生态系统中的目的是暴露给用户的一个特殊的实例属性,所以把它用于私有属性并不合适。
不过,推荐把这两个前缀结合为 $_,作为一个用户定义的私有属性的约定,以确保不会和 Vue 自身相冲突。。
Bad
1 | var myGreatMixin = { |
1 | var myGreatMixin = { |
1 | var myGreatMixin = { |
Good
1 | var myGreatMixin = { |
1 | // 甚至更好! |
4.3(官)在单文件组件、字符串模板和 JSX 中没有内容的组件应该是自闭合的——但在 DOM 模板里永远不要这样做
自闭合组件表示它们不仅没有内容,而且刻意没有内容。其不同之处就好像书上的一页白纸对比贴有"本页有意留白"标签的白纸。而且没有了额外的闭合标签,代码也更简洁。
不幸的是,HTML 并不支持自闭合的自定义元素——只有官方的"空"元素。所以上述策略仅适用于进入 DOM 之前 Vue 的模板编译器能够触达的地方,然后再产出符合 DOM 规范的 HTML。
Bad
1 | <!-- 在单文件组件、字符串模板和 JSX 中 --> |
1 | <!-- 在 DOM 模板中 --> |
Good
1 | <!-- 在单文件组件、字符串模板和 JSX 中 --> |
1 | <!-- 在 DOM 模板中 --> |
4.4(官)组件的 data 必须是一个函数
当在组件中使用 data 属性的时候 (除了 new Vue 外的任何地方),它的值必须是返回一个对象的函数。
当 data 的值是一个对象时,它会在这个组件的所有实例之间共享。若希望每个组件实例都管理其自己的数据。为了做到这一点,每个实例必须生成一个独立的数据对象。在 JavaScript 中,在一个函数中返回这个对象就可以了。
Bad
1 | Vue.component("some-comp", { |
1 | export default { |
Good
1 | Vue.component("some-comp", { |
1 | // In a .vue file 尽量使用简写 |
1 | // 在一个 Vue 的根实例上直接使用对象是可以的, |
4.5(官)Prop 定义要详细:类型、必填、验证
细致的 prop定义有两个好处:
- 它们写明了组件的 API,所以很容易看懂组件的用法;
- 在开发环境下,如果向一个组件提供格式不正确的 prop,Vue 将会告警,以帮助你捕获潜在的错误来源。
Bad
1 | Vue.component({ |
Good
1 | Vue.component({ |
4.6(官)尽量使用指令缩写,而且要么都用要么都不用
用 : 表示 v-bind: 、用 @ 表示 v-on: 和用 # 表示 v-slot。
Bad
1 | <input |
1 | <input |
1 | <template v-slot:header> |
Good
1 | <input |
1 | <input |
1 | <input |
1 | <input |
1 | <template v-slot:header> |
1 | <template #header> |
4.7(官)应该优先通过 Vuex 管理全局状态,而不是通过 this.$root 或一个全局事件总线
通过 this.$root 和/或全局事件总线管理状态在很多简单的情况下都是很方便的,但是并不适用于绝大多数的应用。Vuex 提供的不仅是一个管理状态的中心区域,还是组织、追踪和调试状态变更的好工具。
Bad
1 | // main.js |
Good
1 | // store/modules/todos.js |
1 | <!-- TodoItem.vue --> |
4.8(官)简单逻辑可在模板中使用表达式,中等逻辑操作使用 computed ,复杂或需调用异步方法时使用 watch
模板内的表达式非常便利,但是设计它们的初衷是用于简单运算的。在模板中放入太多的逻辑会让模板过重且难以维护。例如:
1 | <div id="example"> |
在这个地方,模板不再是简单的声明式逻辑。你必须看一段时间才能意识到,这里是想要显示变量 message 的翻转字符串。当你想要在模板中多次引用此处的翻转字符串时,就会更加难以处理。所以,对于任何复杂逻辑,你都应当使用计算属性。
1 | <div id="example"> |
1 | var vm = new Vue({ |
虽然计算属性在大多数情况下更合适,但有时也需要一个自定义的侦听器。这就是为什么 Vue 通过 watch 选项提供了一个更通用的方法,来响应数据的变化。当需要在数据变化时执行异步或开销较大的操作时,这个方式是最有用的。
1 | <script> |
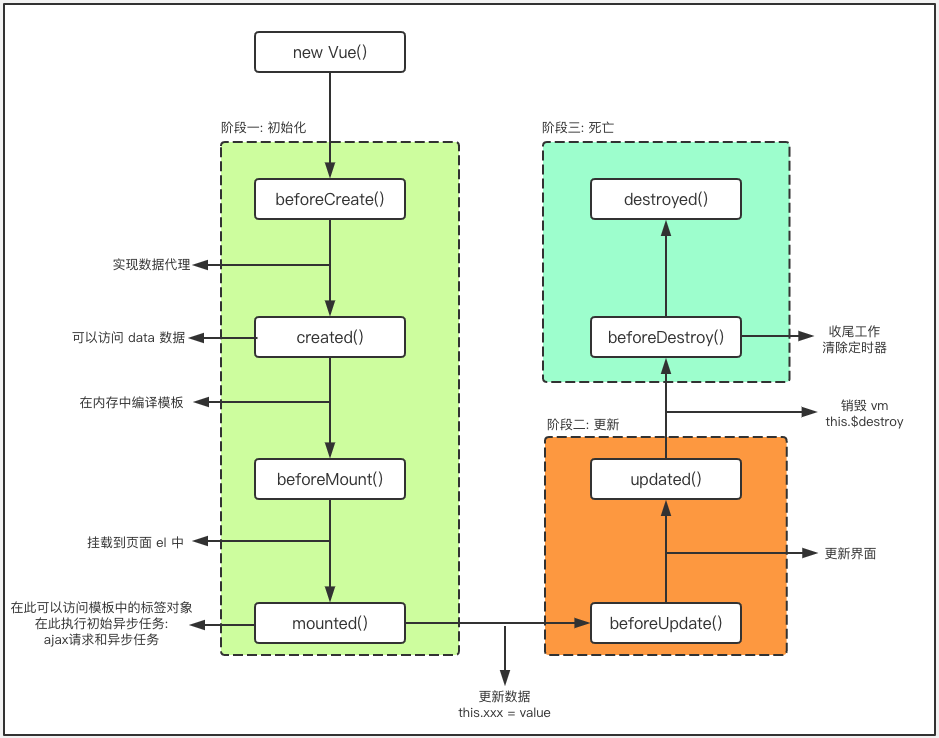
4.9 生命周期函数调用规则
5 编程思想
5.1(官)组件模板应该只包含简单的表达式,复杂的表达式则应该重构为计算属性或方法
复杂表达式会让模板变得不那么声明式。应该尽量描述应该出现的是什么,而非如何计算那个值。而且计算属性和方法使得代码可以重用。
Bad
1 | { |
Good
1 | <!-- 在模板中 --> |
1 | // 复杂表达式已经移入一个计算属性 |
5.2(官)应该优先通过 prop 和事件进行父子组件之间的通信,而不是 this.$parent 或改变 prop
一个理想的 Vue 应用是 prop 向下传递,事件向上传递的。遵循这一约定会让组件更易于理解。访问组件之外的上下文违反了基于模块开发的第一原则。因此应该尽量避免使用 this.$parent。
- 组件必须相互保持独立,Vue 组件也是。如果组件需要访问其父层的上下文就违反了该原则。
- 如果一个组件需要访问其父组件的上下文,那么该组件将不能在其它上下文中复用。
在有些情况下,可能需要对一个 prop 进行"双向绑定"。不幸的是,真正的双向绑定会带来维护上的问题,因为子组件可以修改父组件,且在父组件和子组件都没有明显的改动来源,推荐以 update:myPropName 的模式触发事件取而代之。在子组件中通过.sync/emit模式来改变父组件传入的 Props 的值。
Bad
1 | Vue.component("TodoItem", { |
Good
1 | // parent template |
5.3 谨慎使用 this.$refs
Vue.js 支持通过 ref 属性来访问其它组件和 HTML 元素。并通过 this.$refs 可以得到组件或 HTML 元素的上下文。在大多数情况下,通过 this.$refs 来访问其它组件的上下文是可以避免的。在使用的的时候你需要注意避免调用了不恰当的组件 API,所以应该尽量避免使用 this.$refs。
- 当遇到 props 和 events 难以实现的功能时,通过 this.$refs 来实现。
- 当需要操作 DOM 无法通过指令来做的时候可使用 this.$ref 而不是 JQuery、document.getElement*、document.queryElement。
Good
1 | <!-- 推荐,并未使用 this.$refs --> |
1 | <!-- 使用 this.$refs 的适用情况--> |
5.4 按照一定的结构顺序来组织组件
- 导出一个清晰、组织有序的组件,使得代码易于阅读和理解。同时也便于标准化。
- 按首字母排序 properties、data、computed、watches 和 methods 使得这些对象内的属性便于查找。
- 合理组织,使得组件易于阅读。(name; extends; props, data 和 computed; components; watch 和 methods; lifecycle methods 等)。
- 使用 name 属性。借助于 vue devtools 可以让你更方便的测试。
- 合理的 CSS 结构,如 BEM。
- 使用单文件 .vue 文件格式来组件代码。
1 | <template> |
5.5 接口调用流程
未使用状态管理时:
- 在 services 文件夹下按模块添加方法,该方法包括调用接口以及返回数据的处理。(方便复用)
- 在单文件组件中调用上述方法。
使用状态管理时:
- 在 services 文件夹下按模块添加方法,该方法包括调用接口以及返回数据的处理。(方便复用)
- 在 store 的 actions 中调用上述方法,commit 到 mutation,mutation 改变 state 的值。
- 在单文件组件中调用 actions 中的方法。
5.6 每个分类都只有一个入口(如:router、store、plugins 等分类下)
即每个文件夹下都会有一个 index.js/ts, 目的是对外隔离,当引入该分类下的文件时,不用按每个 JS 模块路径引入,否则调整单个模块位置需要修改依赖它的所有模块。
5.7 每个分类内部模块互相引用时,使用相对路径; 分类之间模块引用时,使用绝对路径
相对路径目的是对外隔离,不和分类外的路径产生关系,同时方便分类复用。
如 plugins 文件夹下的 index 文件。
1 | // Element |
绝对路径目的是从语义上区分模块是否是同一分类,分类路径发生改变时一次性全局替换。如在 main.js 中引入 plugins。
1 | import "@/plugins"; // 按需引入插件 |
vue 组件、assets 等其它各模块的引用路径,类似如下,用"@"直接引用 src 目录下的,而不是使用相对路径。
1 | import AjaxTree from "@/components/tree/ajax-tree"; |
css 的文件引用路径如下,用"~@"替换之前的"../../":
1 | <style lang="scss"> |
5.8 组件封装
组件分为 dumb component(普通组件,一般是 components 里的一个单文件组件) 和 smart component(容器组件,一般是 views 里的一个单文件组件)两种。
普通组件尽量只通过 props 接收容器组件传来的数据,向父组件派发消息,而不做其它任何主动调取数据等工作。
6 性能优化
6.1(官)总是用 key 配合 v-for (性能优化 2)
在组件上总是必须用 key 配合 v-for,以便维护内部组件及其子树的状态。 同时,Key 不要为 index,尽量是一个唯一值,因为数据发生变化时,index 可能不变。
Bad
1 | <ul> |
Good
1 | <ul> |
6.2(官)永远不要把 v-if 和 v-for 同时用在同一个元素上 (性能优化 3)
一般在两种常见的情况下会倾向于这样做: 为了过滤一个列表中的项目 (比如 v-for="user in users" v-if="user.isActive")。在这种情形下,请将 users 替换为一个计算属性 (比如 activeUsers),让其返回过滤后的列表。会获得如下好处:
- 过滤后的列表只会在 users 数组发生相关变化时才被重新运算,过滤更高效。
- 使用 v-for="user in activeUsers" 之后,在渲染的时候只遍历活跃用户,渲染更高效。
- 解耦渲染层的逻辑,可维护性 (对逻辑的更改和扩展) 更强。
为了避免渲染本应该被隐藏的列表 (比如 v-for="user in users" v-if="shouldShowUsers")。这种情形下,请将 v-if 移动至容器元素上 (比如 ul, ol)。
- 通过将 v-if 移动到容器元素,不会再对列表中的每个用户检查 shouldShowUsers。取而代之的是,只检查它一次,且不会在 shouldShowUsers 为否的时候运算 v-for。
Bad
1 | <ul> |
1 | <ul> |
Good
1 | <ul> |
1 | <ul v-if="shouldShowUsers"> |
6.3 组件销毁时及时清除事件监听、定时器等 (性能优化 4)
一般在 created 或 mounted 生命周期函数中添加 事件总线和 window 上的事件监听或定时器,在 beforeDestroy 或 destroyed 中,添加以上三类事件的移除方法。
1 | created() { |
1 | mounted() { |
1 | mounted() { |
6.4 通过 ES6 动态导入的方式引入异步组件 (性能优化 5)
在平时的开发工作中,为了减少首屏代码体积,往往会把一些非首屏的组件设计成异步组件,按需加载。
基于路由
1 | import Vue from "vue"; |
本地注册
1 | <!-- App.vue --> |
6.5 VueX 状态管理
6.5.1 不要过度使用 Store (性能优化 6)
把所有逻辑移到 Store 中会导致更多的性能开销和不必要的复杂性。
在严格模式下,无论何时发生了状态变更且不是由 mutation 函数引起的,将会抛出错误。这能保证所有的状态变更都能被调试工具跟踪到。
开启严格模式:
1 | const store = new Vuex.Store({ |
不要在发布环境下启用严格模式!严格模式会深度监测状态树来检测不合规的状态变更——请确保在发布环境下关闭严格模式,以避免性能损失。
6.5.2 State
6.5.2.1 将数组转化为对象进行存储 (性能优化 7)
即使从接口中返回的数据就是对象数组的形式,并且视图需要将其显示为使用 v-for 指令映射的数组,也应考虑将其作为对象放在存储中。
- 可以轻松地使用 ES6+内置的 Object.keys,Object.values 和 Object.entries 方法从任何对象中获取数组,但反之则有些复杂。
- 作为一种算法,通过键从对象中检索到的内容的时间复杂度为 O(1),如果使用搜索或过滤器来查找相同的数据,则是 O(n)。
Bad
1 | const initialState = { |
Good
1 | const initialState = { |
6.5.3 Getter
6.5.3.1 需要包含一些逻辑
如果要访问子属性,通过 mapState。
Bad
1 | getters: { |
Good
1 | getters: { |
6.6 数据冻结 (性能优化 8)
如果有一个巨大的数组或 Object,并且确信数据不会修改,使用 Object.freeze() 可以让 Vue 不会给对象加上 getter/setter,性能会大幅提升。
在组件中:
1 | export default { |
在 store 中:
1 | const mutations = { |
如果是嵌套对象,则使用深度冻结,也就是遍历对象,用下方的 deepFreeze 替换上边写的 Object.freeze。
1 | /** |
6.7 图片压缩 (性能优化 9)
使用 image-webpack-loader 对图片进行压缩。
安装:
1 | npm i -D image-webpack-loader |
在 vue.config.js 中 添加配置:
1 | module.exports = { |
6.8 使用 KeepAlive 按需缓存路由页面 (性能优化 10)
1 | <keep-alive include="要缓存的组件名称,要缓存的组件名称"> |
6.9 使用 CDN 或者引入其它服务器上的文件地址实现对静态资源并行请求 (性能优化 11)
浏览器针对每个域名能创建的最大 TCP 连接数是有限制的(谷歌浏览器 6 个),通过将静态资源放在不同的域中可以增加并行请求数。
6.10 GZip (性能优化 12)
使用 Nginx 进行动态压缩,具体请看 Nginx 相关的文档(待补充)。
7 其它
7.1 静态分析
使用 ESLint 作为代码静态分析工具,遵从 Airbnb+自定义风格。
7.2 常用插件
Vue-Awesome-Swiper:基于 Swiper4、适用于 Vue 的轮播组件。
Vue-Lazyload:图片懒加载。 (性能优化 13)
vue-svg-icon:可定义 svg 图标的颜色。
7.3 常用工具
Octotree:GitHub 可视化代码树插件。
npm-check-updates:更新 package.json 中的所有依赖到最新版本。
7.4 资源
一张思维导图辅助你深入了解Vue | Vue-Router | Vuex 源码架构
8 写在最后
看过一篇文章,觉得观点挺好的,就直接拿来用了。
Best Practice :最佳实践。Wikipedia 上对其解释为:A best practice is a method or technique that has been generally accepted as superior to any alternatives because it produbces results that are superior to those achieved by other means or because it has become a standard way of doing things. (最佳实践是一种:因其产生的结果优于其它选择下的结果,或其已经成为一种做事的标准,从而被普遍认可优于任何替代方案的方法或技术。)
最佳实践本身是美好的存在,犹如夜空中的一轮明月,照亮黑暗中的方向,指引着摸索前行的凡人。
但凡事有度,子曰:"过犹不及。"
首先,最佳实践容易带来思想包袱,让人无法专注于解决问题本身。
总是希望采用最好的技术方法,不愿意在不正确的做法上浪费时间,导致瞻前顾后,甚至裹足不前。此时的最佳实践,已然成为了一种毒药,一旦偏离了问题本身这个出发点,就会不知不觉走进"宏大构想"的思维陷阱。把简单的问题复杂化,阻碍了迈出第一步,直到能规划出"包罗万象"的解决方案后才肯动手,拖延症就这样来了,时间却走了。
其次,对最佳实践的执念容易让人钻牛角尖,将目标的重心带偏。
过度关注实施过程是否符合标准化,忽视了项目中其它重要的东西,比如用户体验,比如实际需求。
再次,工程师思维,沉迷于奇技淫巧中无法自拔。
比如性能优化。"优秀的程序员应该榨干每一字节内存",听起来很熟悉,不是吗?但经济学上来讲,边际效应决定了一次项目中,越优化性价比越低。有一个很容易被忽略的事实:硬件其实比程序员要便宜。
再比如对设计模式的崇拜。设计模式当然是好东西,但如果像强迫症一样使用它们,坚持用上它们才是正确的编程,就会导致按图索骥,强行让问题去适应设计模式,而不是让解决方案针对问题,这就本末倒置了。
最后,一个项目的开发顺利与否,并不在于技术选型是否为最佳实践。
工作数年,大小项目经历若干,慢慢体会到,一个项目的开发顺利与否,并不在于技术选型是否为最佳实践,更多的时候,取决于开发方案和技术储备之间的平衡。做项目毕竟是要讲方案落地的,如果最佳实践中的技术成本,超出了开发者的落实能力,那就是坑,这时盲从最佳实践无异于挖坟。如果是一个人的项目,抽时间恶补一通,兴许能填填坑,这取决于 IQ。但要是一个团队,那就不是什么 IQ,EQ,QQ 的问题了,这中间产生的学习成本,集体培训成本,反复沟通成本,大量的初级错误,千奇百怪的代码,互相冲突引发的焦躁情绪等等。这些负面的东西如果不能妥善的处理,足以抵消掉最佳实践带来的好处。别忘了,deadline 正在迫近。
当尘埃落定,蓦然回首,最佳实践很可能没你想象中那么重要。它更多的是一种精神层面的求道,并非物质世界的必要。
全篇能全部看下来,觉得自己基础扎实,想在前端道路上有进一步发展的请加微信: zapzqc
只要你肯努力,这里将会为你提供充足的发展空间。
Vue.js2最佳实践(持续更新至Vue.js3出来😁)
https://ths-fe.github.io/2020/04/29/Vue-js2%E6%9C%80%E4%BD%B3%E5%AE%9E%E8%B7%B5/